1. This past Sunday was Passion Sunday, at least according to the old liturgical calendar. Since we attend the Latin Mass each week, that tends to be the calendar we observe. During Passiontide, some churches still maintain the practice of covering the crucifixes and statues with purple cloth.
For a couple years now, Tom has longed to do this at home too. Last year, we didn't think of it until it was almost too late - a few days before Easter. We purchased three yards of cloth, but never got around to doing anything with it. But last Saturday night, we amazingly remembered that the next day was Passion Sunday, and that we should dig out the cloth. Actually...by the time we had actually
found the cloth, it was well past midnight. I decided to go to bed, and leave the statue-veiling to my wonderful husband. When I woke up in the morning, I thought it was kinda cute that he had covered
every last statue in the house - including the tiny little St. Therese and St. Thomas Aquinas statues on the bookshelves. It's funny - there are just these two small purple bulges sitting there now.
For an idea of what the house looks like now,
 On the mantle
 Our home altar
On the way to Sunday Mass, we started asking ourselves
why it is that Catholics cover statues at the end of Lent like this. We both
liked the practice, but realized that we didn't have a good explanation for it. But this is one thing I love about our Catholic faith. Even when you don't fully understand the "why" of something - if it is Church teaching, you KNOW that it is true and good. So we were happy to observe the tradition, and learn the reasoning after the fact.
A little research turns up a satisfying explanation. According to
Fisheaters:
Today, statues and sacred images (except for the Stations of the Cross) are veiled with purple cloth beginning at the Vespers of Passion Sunday, and they remain covered until the Gloria of Holy Saturday, at which point Lent ends and Eastertide begins. Catholics cover statues and icons, etc., in their homes for the same time period (the cloth shouldn't be transluscent or decorated in any way).
This veiling of the statues and icons stems from the Gospel reading of Passion Sunday (John 8:46-59), at the end of which the Jews take up stones to cast at Jesus, Who hides Himself away. The veiling also symbolizes the fact that Christ's Divinity was hidden at the time of His Passion and death, the very essence of Passiontide.
At the Vespers Mass on Holy Saturday, Lent ends and Easter begins: the statues are unveiled at that time in one of the most glorious liturgical moments of the entire Church year, a moment that affirms His divinity and proclaims that "He is risen!"
And here's more explanation at
Father Z.'s blog.
2. A couple weeks ago, while waiting for one of my tutoring students to arrive at the library, I was browsing in the craft book section. I really enjoy doing crafty things, but I suffer from a severe lack of creativity. I
need to have directions to follow or a friend showing me exactly what to do in order for me to produce something nice. I thought it would be fun to find an idea for a new project to start. I found a great book titled, appropriately,
The Great Book of Egg Decorating. It was a fortuitous find, since I'd been saying to Tom only a week earlier that I would like to decorate blown eggs (which is when you literally blow the insides out a hole on the other end of the egg, allowing the shell to be decorated and last forever), as I used to do when I was a kid.

The book does teach you the basics of how to do the ever-popular and ever-impressive Ukrainian-style eggs. But for the most part, it focuses on some different styles of decorating, using different tools.
Most of the decorations shown in the book are drawn onto the eggs with wax. They suggested that you construct a special wax-melting device. Knowing that Tom loves little projects like that (and wanting to try out some designs!), I asked him to make me one. He did a great job, and even added a little feature that will make the height of the "pot" adjustable.

When the wax is melted, you dip a pin head into it (which is inserted into a dowel rod or pencil, for ease of use), and "write" your designs onto the eggs. I imagine it's a lot like using a quill and an ink well. Pure beeswax makes the base, and then you can add things to color it.

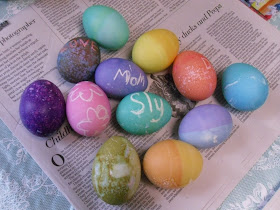
I purchased candle dye in red, which I used on the wax of my first four attempts (the eggs shown in the back of the picture, below). But then I discovered that you can dye the wax for much cheaper but just as effectively with a chunk of Crayola crayon (used for the pink designs on the two front eggs).

So far, I've only been experimenting on undyed egg shells. Mostly, I just wanted to get the hang of using the tools. My first couple eggs were pretty sloppy, but I'm getting better. When we dye Easter eggs next week, I want to have a little stock of pre-blown eggs that I can dunk into the dyes.
They also show how you can drill "decorative" holes into the eggs with a tiny drill bit (which Tom already eagerly went out and purchased for me!), and can even lace little ribbons through the holes for a pretty effect. I'm looking forward to trying that out soon.
I will post more pictures as I create them!
3. Okay, this one is a really lame "project" to even mention, but...Today, my purse died, but I brought it back to life!
I'm not one of those gals who likes to own several purses at a time, and switch them out with her outfit, or with the season. I am a one-purse woman. And that one purse needs to have certain very exact features (such as a long strap so it can drape across my front from shoulder to opposite hip, and the right number of zipping or snapping compartments for my phone, camera, etc.). And while I only use one purse, I JAM that thing full of every item I might possibly want anytime I'm out of the house!
It takes me a lot of searching to find a worthy purse each time I need to replace one (which is only every three years or so). So I get worried when my purse is starting to get shabby, as mine has been doing lately. Today, while I was out, the strap completely broke off. But I managed to sew it back on, and I think it should hold for a little while more!

Though I think it's time to start shopping for a new one...
4. Sly got his first tooth a few days ago! And coincidentally, I had just decided to start trying out some new foods on him, and helping him learn to feed himself. The pureed baby foods are fine, but, let's be honest, it's inconvenient to always have to be spooning each bite into his mouth. I wanted to start trying him on foods that could be made into small baby-size pieces that he could grab in his hands.
For the past few days, he's been happily enjoying various breads, Graham crackers, Cheerios, small pieces of grapes, and banana chunks out of his own little hands. It's a lot of fun to introduce new things to him, and I'm definitely open to suggestions for some other baby-friendly foods, if anyone's got them.
Last night, he even got to enjoy some of the same dinner as Tom and I were eating - stuffing and cranberry sauce (I was in the mood for Thanksgiving foods last night, so I cooked up a pseudo-Thanksgiving dinner!)
 Enjoying some of Tom's omelette from brunch on Sunday
But it certainly leaves a mess. I now have to scrub down his hands, his face, the entire high chair, and a 4-foot diameter of kitchen floor every time he finishes a meal! But it's great that we can eat our meals at the same time now. During breakfast and dinner for the past few days, I've been able to sit at the table with my food, while Sly sits with me in his high chair, and figures out how to feed himself.
5. My 40 Bags in 40 Days efforts were resumed again last night. I went through almost all my cds, put the discs and booklets into binders, and threw away the cases!


